Club Meeting: 14 February 2024 Report by: Graeme Mackay
Editors note: I missed the meeting due to Covid-19, it appears there was also a lack of a photographer on the night so the header photo is the only one I have found (stolen from facebook)
Demonstration With Art Deco design style
A well-reasoned introduction about the place of his teacup and saucer. The works following the style of a previous demonstrator who provided the Teapot to start.
The base wood was avocado in two blocks of 130 x 100 x 100 mm. And sized to emphasise the straight lines of Art Deco design work. The Woodturning process was straightforward.
The block for this also was roughly cylindrical. As per Dick’s comments, spigots on the top start the process. Next to bottom spigot that allows the marking the size the teacup/author. Making sure that the foot was wide enough to fit the planned saucer of around 130 mm diameter.
Measuring: An important part of the process of ensuring that the wall thickness was even and sufficient to cover the straight sides of the Art Deco style saucer. On the finishing of spigots, Dick offered a variety of systems to take the base spigot off. These range from large diameter chucks through to standard Coles tools.
The cup was simple and following standard processes. The emphasis was on measurement and checking. The style was nothing fancy. The main choice being the use of, regular vertical grain.
Spigot at both ends of the cylinder, standard block, in this case, a square block 100 X 100 x-100 mm. millimetres. A reminder to check measurements and marking cut of the foot. The straight line from the lip edge to the foot has its own little issues centering around need to have even wall thickness.
The Cup Handle fixing raised interesting questions around which method to use. A good variety of options put forward; Dick taking the high-tech rotary pathway along with bits of holdings, brackets, and associated fixture devices.
All of which needed short period of adjustment and trial. The holding system in straight forward and glue fixed with minor adjustments. Actually, an extensive round of adjustments.
Dick put forward several challenges for painting, embellishing, and applying patterns. A number of quite interesting methods were used, discussed, forwarded, group reviewed with some traditional options. And a good use of stencils.
The group disorder indicated that there were many simple systems. All of which put forward with great crowd support.
Terry Scott showed a teapot in what he believed was the style Art Deco that is the term theme. Whether it was Art Nova as he believed it certainly was a product design that would be appreciated whatever category it might be in.
The wood, Macrocarpa, began as a 110x110x250(?) block and a piece 110x 20×250 flat. The latter was for the handle and spout.
The block was mounted between Steb Centres and turned round with the roughing gouge with the tool rest just above centre. A tip given by Terry was to mark the bevel with a black felt tip to see how the bevel was rubbing against the wood because the black should be removed from the cutting edge across the whole bevel and not just the tip/cutting edge.
Once round to 110mm, cutting from the centre to the end to avoid clipping off a splinter , which is a real possibility if you come in from an end, Terry cut a spigot on the tail stock end to fit the 100mm chuck. The following points were marked from the spigot- 20/150. Using the parting tool on the 20mm mark and cutting on the 150mm side a groove was cut to achieve a diameter of 80mm. Between the roughing gouge and skew a straight line was cut. Surface was finished with clean cuts by the skew moving slowly down the slope to the base of the teapot. The base was also cut as the access was cleared. Terry pointed out that the slower the movement with a sharp tool, ensured no spiralling.
The profile was then marked, in pencil, at each index of the chuck from the 150 to the 80 diameter. Lines were also marked every 10 – 20mm up the side. The resulting grid pattern was for determining the location of the spout and handle but can also be used for positioning graphics.
The base was then placed in the 100mm chuck, ensuring alignment using the centre created by the Steb centre in the now top, the chuck was tightened and tail stock removed.
Using a Forstner, in an extension, a hole was drilled to depth as marked with masking tape on the shaft, remembering to remove swarf/wood regularly and allowing the forstner to cool.
The top of the teapot was cleaned up and a recess for the lid to a depth of 5/10mm. The interior wood was removed by using a combination of hollowing tools.
The lid was made from cross grain wood and the process was as any lid with a knob.
The handle and spout were drawn onto the board and the angle of the handle was 85 not a right angle.
The spout and handle were shaped to fit the curve of the teapot. Panel pins were inserted, 2 on each interface between the surface of both spout and handle and then glued onto the teapot using the grid lines to ensure the correct position especially for the spout so outlet is below lid
Club Meeting: 22 November 2023 Report by: Kieran FitzGerald
John rescued us this week when he responded to a last minute request to fill in for a demonstrator who had to withdraw for urgent family reasons. We are indeed very grateful to John for his unreserved and willing acceptance to take on this role.
The demonstration showed us how to make a truly natty spinning top which is somewhat different to others I had previously seen. The trouble was I was sitting in the back rows, and the top was rather tiny. At the beginning of the demo I had no idea what the finished product was going to look like. So as I jotted down notes of what John was doing I was silently hoping like hell it all came together in the end. It did – I think.
The top is made up of 5 components. Part 1 – the tip. For this John used a brass rod (purchased from RS Components). I’m estimating the diameter of the rod at 4mm, and the final cut length of the tip about 15 – 16mm. He held the rod in a collet chuck and with it slowly spinning in the lathe he filed the sides down to about 2mm, and then cut it off to length. No need to work on the tip at this stage – that will be done later.
Put the rod aside. The second component to make is a tricky little ring, or yoke – call it what you will – I will refer to it as a ring. Because of its delicate nature, this should be made from a strong, tight grained wood. John is using black maire. With production techniques in mind, John prepares for this part with a view to making 4 or 5 rings from the one piece of wood. He takes a perfectly square 40 x 40 x approx 90mm blank, and marks it out for 6.5mm holes at 15mm centres. He drills the holes right through, as straight as possible. Then he cuts a tenon for his 35mm jaws and secures it in the chuck on the tenon. He rounds it down to about 30mm. Next he rolls beads along the length of the piece, with each 6.5mm hole at the high spot of each bead. He sands and finishes with wax, then drills the centre with a 19mm forstner bit. The first ring is then parted off – the finished width is around 12mm. John then uses a sanding disc on the lathe to create a small flat on each side so you can grasp it with your fingers. He sands the centre of the ring with a split dowel with a sandpaper wrap spinning in the lathe, and sands and waxes the entire ring. John recommends using a Beall system finish if you have one.
The next part to make is the main body of the top. The blank for this is about 55 x 55 x 60 long. The size is not critical, as long as the finished diameter is about 50mm. Nor is the final shape of the top set in concrete, although I would imagine for longer spin time a low centre of gravity is preferable. John turns the bottom end of the top first, to a broad conical shape, with a finished diameter of 50mm. He creates a small flat at the very bottom, and drills a hole to accept the brass tip in a tight, press fit. A long drill can wander off centre, so John uses a short, centreing drill bit. He taps the tip home with a hammer, and then by turning, filing and sanding, he brings it to a tidy point.
The critical feature of the top is to have the tip centred at the bottom, and the spindle (yet to be made) centred exactly at the top, so that the axis of the spinning top is vertically centred fair and true through the top. John has tried different methods to achieve this, but the most successful is to create a tiny spigot on the bottom of the body of the top while it is still mounted on its original tenon. Then it can be turned around and mounted in the jaws and will be exactly on centre. The spigot only needs to be about 1mm deep, but once mounted it needs to be turned with very gentle cuts. If the spigot is cut to the near closed diameter of the jaws, the grip is stronger and the claw marks of the jaws will be minimised to near invisibility. It helps to have a sharp face on the gripping end of the jaws (ie, no chamfer on the claws of the jaws, this can be achieved by carefully grinding them flat). (Note: it is amazing how securely a piece can be held by the tiniest of spigots, and this technique can be deployed in a variety of situations.) Having cut the spigot on the bottom, John advises that at this stage the bottom of the top may be coloured or textured. Turn away as much waste wood as you can at this stage while it is still firmly mounted. Sand and wax. Next, turn it around in the chuck and carefully turn the top portion of the body. John cuts the top to a rounded shape, being mindful of the need to keep most of the weight in the bottom portion of the top body. Once shaped, using a drill in the tailstock, drill a 6mm hole which will accept the shaft (to be made next).
Sidenote: It is worth observing that in the woodturning duo that is Annita and John, blue tape denotes the tool belongs to Annita, and yellow tape indicates John’s ownership. Learn from this.
Component number 4 is the spindle or shaft. This is a dowel held in pin jaws and cut down so that one end features a tight press fit into the body of the top (using the tailstock as a press), a spindle section which passes through the holes drilled in the ring, and a knob at the top to prevent the ring coming off. The shaft must be long enough to accommodate the section that fits into the body, the diameter of the ring plus a small clearance at each end, plus the knob. The ring must be allowed to spin freely on the spindle. At the point on the spindle which is at the centre of the ring, drill a small hole through which the string will be passed, and countersink to accommodate the knot in the string. Part it off, fit it all together and press it home.
The fifth and last component is the string. This does not need to be long – about 250mm is sufficient. Stiffen one end with superglue and pass it through the hole in the spindle. Secure it with a knot at the other end.
Wind the string round the spindle, a tug or two, and you’re away. She spins like a ballerina. Thanks John, that was great.
Club Meeting: 15 November 2023 Report by: Kieran FitzGerald
Usually we think of woodturning as a means of turning round objects – not our Brucie. In what he described as his last demo before moving to Dunedin, Bruce’s mission was to make and decorate a perfect cube on the lathe. It may be tricky to describe in words, but the accompanying photos will illustrate the novel and somewhat delicate piece that Bruce produces.
I’m not clear what the origin of this design is, but Bruce informed us that in the past it has been made in metal by fitters and turners as part of their apprenticeship. Colin Wise has also previously demonstrated this technique at the club.
Hard woods are preferred for this exercise to provide strength for the finished structure and to get a finish which requires minimal sanding. Bruce chose matai for his demonstration piece, and had two completed cubes in swamp rata and black walnut.
To start the project, Bruce cuts a 70mm cube with the drop saw, as accurately as possible. Next he uses a dead flat surface to sand one side of the cube to perfect flatness. The finished size of the cube will be 64mm square, and the whole process requires total accuracy. The accompanying plans show the cut dimensions required, and the templates Bruce uses to accurately measure the depth and width of his cuts.
The initial turning of the cube (ie, facing off to 64mm on all sides) is done on a faceplate, and Bruce emphasised the need for the face of the faceplate to be perfectly true. At first Bruce could not get faces on his cube at 90° to each other, and it was because his faceplate was not running true. He used a digital dial gauge to measure it to within 0.2mm.
The cube is positioned on centre with the sanded flat side against the faceplate, and held with the tailstock. Dabs of hot melt glue will hold it when the tailstock is removed. A few gentle passes with the gouge will bring the depth down to the required 64mm. The finishing passes obviously need to be done with the tailstock out of the way. Use a steeledge ruler to make sure the side is perfectly flat. Give it a quick sand. Getting a straight and true face requires a very steady hand with the gouge. Bruce showed us how he points his index finger along the shaft of the tool, and supports the handle under his arm, so in effect the gouge becomes an extension of his arm.
Re-position the cube on the faceplate to the opposite face and repeat the squaring off process. Continue this until all six faces of the cube are down to 64mm and are perfectly square to each other. Use a set square to check for right angles – it may be necessary to use a paper shim to correct for any slight out of trueness. Mark the centre on each face as you go, for later re-positioning in the chuck. Make sure you carefully clean any residual glue off the faceplate so the face remains true. (Note that Bruce thought the project might take about 2 ½ hours from go to whoa, so to fit the demo into the shorter time slot he had already prepared five faces of the cube.)
I should mention that before any turning starts, an acruline alignment tool should be used to ensure the tailstock and headstock are perfectly aligned.
Now the fun begins – Bruce is ready to start tunnelling out the first side – this involves a series of perfectly centred concentric circles cut towards the centre of the cube. Bruce mounts the cube in a chuck which has two 100mm powergrip jaws fitted (numbers 1 and 4). He uses packers to protect the jaws from crushing the cube. He brings the tailstock up before fully tightening it down so he can centre it on his previously made centre mark. The first cut needs to be 54mm wide and 9mm deep. He scribes the position of the cut with dividers, and carefully makes the cut using a ½” skew and a small parting tool. The edge of the cut needs to be straight and the bottom flat. Bruce uses a template to achieve this. To get a clean cut the lathe speed is set at 2000rpm and the tools are super sharp. The next circle is cut at 40mm and 7mm deep, using exactly the same method. The third and last cut is 26mm wide and 5mm deep. Bruce then uses a 12mm brad point drill to drill a hole which passes through the centre of the cube, but not all the way through. He depth marked the drill bit at 40mm. When each side has been drilled the resulting hole forms the final hole within a square in the centre of the tunnelled cube.
The tunnelling process needs to be completed on each of the 6 sides of the cube. The second side is the side which is a 90° turn to the left or right, not the side directly opposite the first. Needless to say, as each side is tunnelled out and more wood is removed from the cube, the resulting structure becomes more and more flimsy. To strengthen the structure while he tunnels out the last side, Bruce glues a 12mm dowel through the centre of the cube, and secures this at each end with round plates inserted into the first circles cut on two opposing sides. This is removed at the very end when the last side has been tunnelled.
As he usually does, Bruce finished his demo with a random number draw using door numbers, and the giveaways were a tunnelled cube and sets of golden rule and sphere calipers. The lucky and grateful winner of the cube was none other than Dick Veitch, and other winners were Terry Bennett, Terry Scott, Ross Johnson and Lindsay Amies.
Thank you Bruce. This was indeed a challenging demo requiring precision and care, and delivered with all the banter and fun that we have come to expect. We are going to miss you; our loss is Dunedin’s gain.
Click on Plan below to load full size PDF for printing
Club Meeting: 8 November 2023 Report by: Roger Pye
This was a demonstration of intrigue and interesting variations to straight forward woodturning.
Our demonstrator was Peter Williams, a visitor from Northland Woodturners & Woodworkers Club. Whangarei. Peter, actually lives in Kerikeri, so twice every month, he makes the one and a quarter hour perilous journey from Kerikeri to Whangarei and back. That’s dedication to the cause.
There must be something about Kerikeri because it was only a few years ago that the manufacturer of “magic” Munroe hollowing tools moved to Kerikeri from the South Island.
Peter is also well known as the maker of Kareem Polishing wax. As a preliminary Peter had a short video on screen to show how his brother, who has always lived in England, has devoted his life to pottery. His point was that not all potters have to make round things on a potter’s wheel, as shown in the video. This being the case then “Why should he make everything round on a woodturning lathe”. So that turned out to be the subject of the nights demo.
Some examples of various finished items were displayed, all elliptical, although some had round bases to stand on. One was hollowed and carved to show feathers with see-through holes and cervices. Another was close to a live Tuatua seashell. The main point being that the elliptical shape can be turned provided that a wedge is used inside two slabs of matching wood. The accompanying photographs will show exactly the aim of this exercise.
Starting with an even grained piece of timber measuring about 125 x 125 mm and 250 long it is important to cut it exactly down the centre. Next a wedge is made from any suitable wood. This wedge will sit between the divided original slab. The wedge thickness at the blunt end will vary according to your choice of elliptical finished shape. (Your answer will be simple when you have made at least one) Anyway the true wedge shape is important. Best you make a cutting table for your bandsaw. (see photograph) The trick is to make a wooden slide to fit the running grove in your bandsaw table. Attach this to a sliding flat top which will be grooved for the travel of the bandsaw blade about ¾ of the way across. A back fence will be attached at right angles. Use a tapered sledge up against a side fence mounted on the sliding platform. Cut your wedge and clean the faces on a good flat sanding table.
Glue the wedge in place using papered joints. It is first necessary to put spurs in place to stop the wedge sliding out under clamp pressure. This can be a small dowel in the wedge thick-end area to be cut off at the tail-stock end later. Leave joints at least 24 hrs of even 48 hrs if possible, for glue to harden.
Turn the now tapered slab to a round tube, then start a selected shaped curve down to a small diameter of about 25mm at the tail-stock. Use a low speed as paper joints can be lethal. Create a chuck spigot for an 80mm chuck at the head stock end and cut off the small tail stock waste with handheld cross-cut saw. Remove and remount using a four-jaw chuck.
A 15mm Forstner bit will be used to start the hollowing process when drilled to the full depth of the planned interior. Next drill several 9mm holes through the wedge section into the centre. This makes it possible to gauge the thickness while hollowing. It also makes it easy to blow out shavings with an airgun.
It is also advisable to choose a solid ring of a suitable diameter to glue in place over the shaped exterior some halfway along the hollowed-out zone. But first apply masking tape over the gluing area to avoid nasty stains occurring. Also run a knotted cord against the ring to provide easier removal. Glue on the ring with Hot Melt Glue.
When hollowing is finished, remove the ring and unmount the workpiece from the chuck then open the two paper joints with a long carving knife. Sand on a flat sanding board to remove unwanted paper and glue.
Take special care to glue both halves together using the lathe chuck at one end and soft jaws fitted with heavy sponge at the other. A “glue-chuck”(see illustration) is used with the correct ring to hold the work in place for the removal or shaping of the base spigot.
Terry called the lidded box the Midas because it became his signature piece and he made 100’s and was a great money earner.
Terry tabled several examples of his work from small pieces to very large pieces and some with variations from plain wings to highly decoratively carved. Selection of wood is essential as is ensuring the alignment of the Head and Tailstock.
The wood needs to have straight and tightly grained and the demo used kiln dried Kwila cut 75x175x250 the wood must be squared true and the ends were treated with superglue to ensure fibres are firm It was mounted on a screw chuck using a fine thread with the hole drilled in the center of the 75×250 face. Because the wood is rotating, like a propeller, care must be taken.
The outline of the final product was drawn on the 75×250 side indicating the curve and position of the box, which had a bowl profile. The waste is marked to ensure you only cut out what you have to. The bowl gouge of choice was a 55 with a fingernail grind and using a draw cut to ensure the wood being cut is supported by the wood below and you are not risking entering the end grain.
Marking the outer edge of the wing helps highlight the danger area. The progress is slow to ensure a safe and desired result. The accuracy of the curve is confirmed by using a glue stick. A 30mm spigot is turned on the bottom of the bowl to enable remounting for the shaping of the wing and hollowing of the bowl.
A vee cut is made where the box/bowl meets the wing to assist in defining the top. It is recommended that the wing is supported on the underside by gluing dowels/struts from the wing to the bowl before turning Speed is 500 – 700 for the process.
The remounted wing is shaped with the rim of the bowl seen to extend above giving the appearance of it sitting into the wing. A rebate for the lid is cut and is sized to take the 30mm chuck, in expansion mode, so the lid fit can be managed. Following the wing curve remove the waste.Sand and finish.
Turn the lid ideally from the same wood ensuring the grain alignment. The lid fit should be loose because if it is tight the whole piece may be lifted when the lid is lifted risking it falling resulting in the wings breaking off. I finial can be added. Note pianos made after 1940 did not have Ebony keys.
A great demo and there is a DVD in our library or available from Terry that gives more detail.
Club Meeting: 18 October 2023 Report by: Kieran FitzGerald
Tonight the club welcomed Teles as a first time demonstrator. Teles’ life as a tradie includes antique furniture restoration and cabinet making, so with this background we pushed the lathe out of the way and erected Teles’ site workbench. Let the demo begin.
How many of us have picked up a roadside set of drawers or replaced an old piece of wooden furniture that has seen better days? These old treasures are a goldmine of beautiful old timber for the enterprising woodworker. Teles took the kauri sides of a set of drawers to demonstrate how to make a pencil box. Box making is the basis for so many wood working projects, and the dovetail joint is a time-honoured and integral part of much furniture and cabinetry.
With pre-cut sides and ends, Teles started to show us the techniques for hand cutting dovetail joints. His aesthetic preference is for older style narrow pins. The standard ratios, and starting point for marking out the dovetails are 1:6 for soft wood and 1:8 for hard wood. Since Teles was using kauri he took an end piece and measured 1cm one way and 6cm the other way and drew the angle of the first dovetail. He then took his sliding bevel and set it to the same angle so he could mark out all the dovetails. Teles set a marking gauge to the thickness of the wood he was using, and scribed a line to denote the depth of the dovetails.
Teles had taken on board advice that there is learning to be had from doing a demo, and in this situation Teles had discovered this to be true. His learning was that he had to think about and plan for the rebate he would need to cut for the sliding lid of the pencil box before he raced in and cut his dovetails.
First step is to decide the number and spacing of the dovetails. Three is appropriate for this size box. With one of the end pieces, mark out the pins first, starting in the middle. Then Teles used a Japanese fine tooth dovetail saw to cut out for the pins, to the depth of his scribed line. The next step is to form the gaps between the pins. The pin sockets at each side can be easily cut off with the saw. The centre sockets need to be removed with a chisel.
At this point Teles became somewhat animated, because he is a chisel aficianado. However he managed to restrain himself and limited his discussion to the types of most commonly used chisels, these being the firmer chisel, which has the bevelled sides, the mortising chisel, which has square sides and a slightly gruntier blade, and the paring chisel, which has a less bevelled cutting edge for paring end grain.
Teles used a firmer chisel to chisel out the gaps between the pins and tidy up the edges. Then, using the pins he had just cut he marked out the tails on one of the side pieces. These pieces were labelled to facilitate assembly later on. Cut out for the tails with the dovetail saw, and as with the pins, use a chisel to cut out the wood between the tails. Try a test fit, and adjust any of the cuts with a chisel or Stanley knife until a firm fit is achieved. The joint will hold tightly together without any glue, and can be disassembled if necessary.
Continue to cut the dovetails for each of the corners, scribe lines and, with a chisel, cut the rebate for the sliding lid, and assemble your box. Sure, the modern woodworker could have used a router and various jigs to do the same job, but there is nothing so satisfying as the beauty, sophistication and strength of a hand cut dovetail piece.
Teles rounded out his demo with a history and explanation about the vast array of hand planes which are used in wood working. As an avid collector of planes, Teles said that the quality of many of today’s planes cannot rival their older forebears. He described and showed to us some of the different planes, including:
Stanley planes numbered 1 through 8. Stanley planes are regarded by some as the benchmark when it comes to the varying range of planes. The #5 would likely be the most common plane in use. Moulding plane – a narrow wooden plane which came into commercial use in the 18th century with the industrial revolution – before that each woodworker made their own planes. Compass plane – for shaping curves – Teles uses this for making templates to use with his router. Rebate plane – self descriptive – the blade goes all the way to the edge. Scraper plane – useful for removing finishes, eg varnish, off recycled wood. Block plane – a small low-angled plane for touch up work etc.
Tonight gave us a most interesting departure from our usual routine of making round stuff. Thank you Teles – your skill, knowledge and enthusiasm was totally infectious and may certainly motivate me to try dovetailing instead of the boring rebate and glue joints I have surrendered to in the past.
Club Meeting: 13 Septembet 2023 Report by: Roger Pye
Once again Dick was in his element showing us how to make something. While looking complicated it is really quite straightforward. In true fashion Dick arrived with a “Christmas Box” loaded with parts of his ongoing demo completed and ready to display at the appropriate time.
Select a nice piece of wood without shakes or knots about 150 x 150 x 75 mm. Drill a centre hole in which to mount an expanding 50mm chuck. Mount onto the chuck and form a mounting spigot. Round out in the shape of a tortoise shell, leaving the outside face flat for a least 40mm.
Reverse mount onto your spiggot. Then cut a full diameter ring which you will cut into five equal lengths, four legs and one neck. Three quarters of this ring can be completed by working the outside top corner of of your mounted wood. Cut 25mm below the top edge on the face and 25mm along the top outer face. Do not let this second cut intersect with the first cut. Then proceed with the use of a 25mm round template to cut and shape a neat ring. The inner attached section will be treated later. Sand as needed. Cut ring off the main mounted body taking care to avoid damaging when it falls free.
Reverse the ring and glue with hot melt back onto the lathe from where it was removed. Proceed to complete the ring to size and sand.
The completed ring is ready to cut into five equal sections. (3.143 X the outside diameter divided by 5). Mark outside edge and cut five pieces.
Finish the remaining wood still mounted to be a hollow tortoise shell lid for the completed tortoise. That is, hollow the inside to fit over the body still to be turned. Include a mounting ring yet to be matched on the body section and several decorative rings inside. Reverse with the use of an expanding 100mm chuck. Remove 50mm mounting spigot a carefully finish the whole outer face of the shell.
The outer shell will be more realistic if the scutes markings can be drawn on the outer face of the shell and finished with pyrography.
Mount another block of similar wood to shape for the body. Should be about 140 x 140 x 80mm and have a predrilled hole suitable for a 50mm expanding chuck. Prepare as for tortoise shell above but top edge must fit the previously prepared mounting ring on the shell/lid. Keep the wall thicknes at least 18mm to allow for mounting holes to be used for legs and the neck plus the tail.
Another block of wood 45 x 45 x 150mm is mounted in the open jaws of a 50mm chuck to make a head and tail. Cut a suitable tail including a 12mm mounting spiggot. Then make a head into which you can drill a 25mm hole for mounting. Be sure to shape with one end tapered for the head and mouth.
The body is marked out to drill 25mm leg holes and a neck hole higher than the leg mounting position. Drill all mounting holes in a drill press including a 12mm hole for the tail. The head should have flats positioned for eyes and mouth marked out for finishing with pyrography.
Assemble components with suitable glue. Fit eyes and define the mouth.
Club Meeting: 6 September 2023 Report by: Bob Yandell
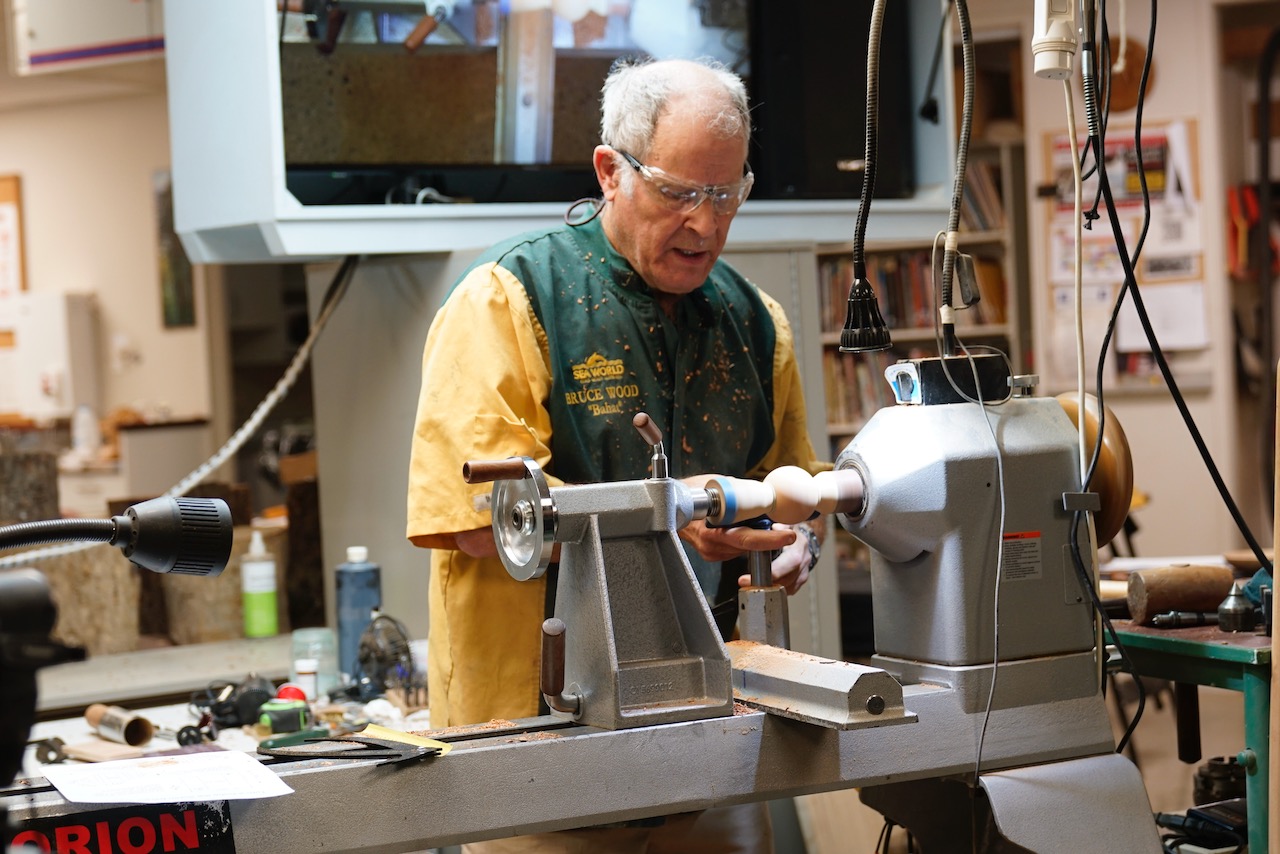
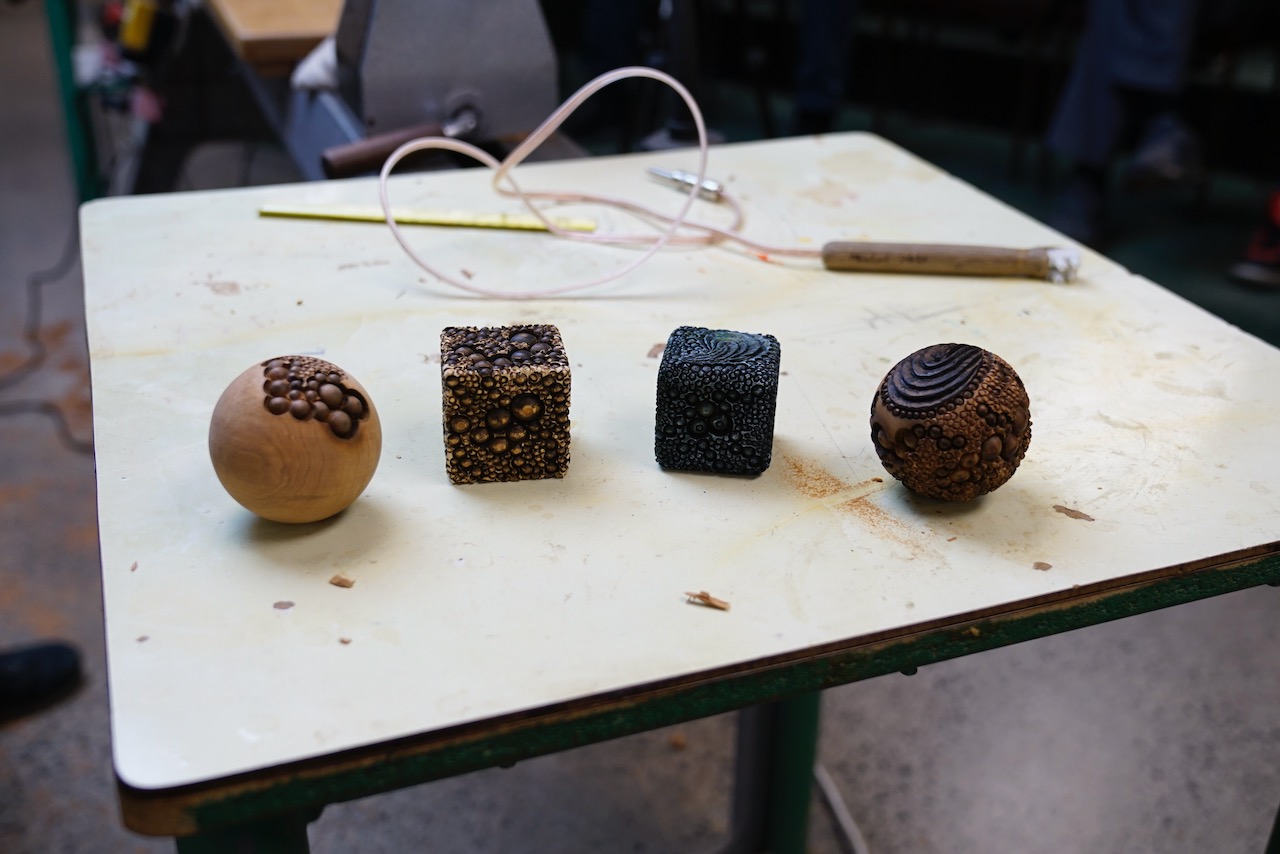
The subject covered, in one, what is normally covered in three and as usual at a speed only possible if your name is Bruce Wood. Informative, creative and new toys.
Part 1
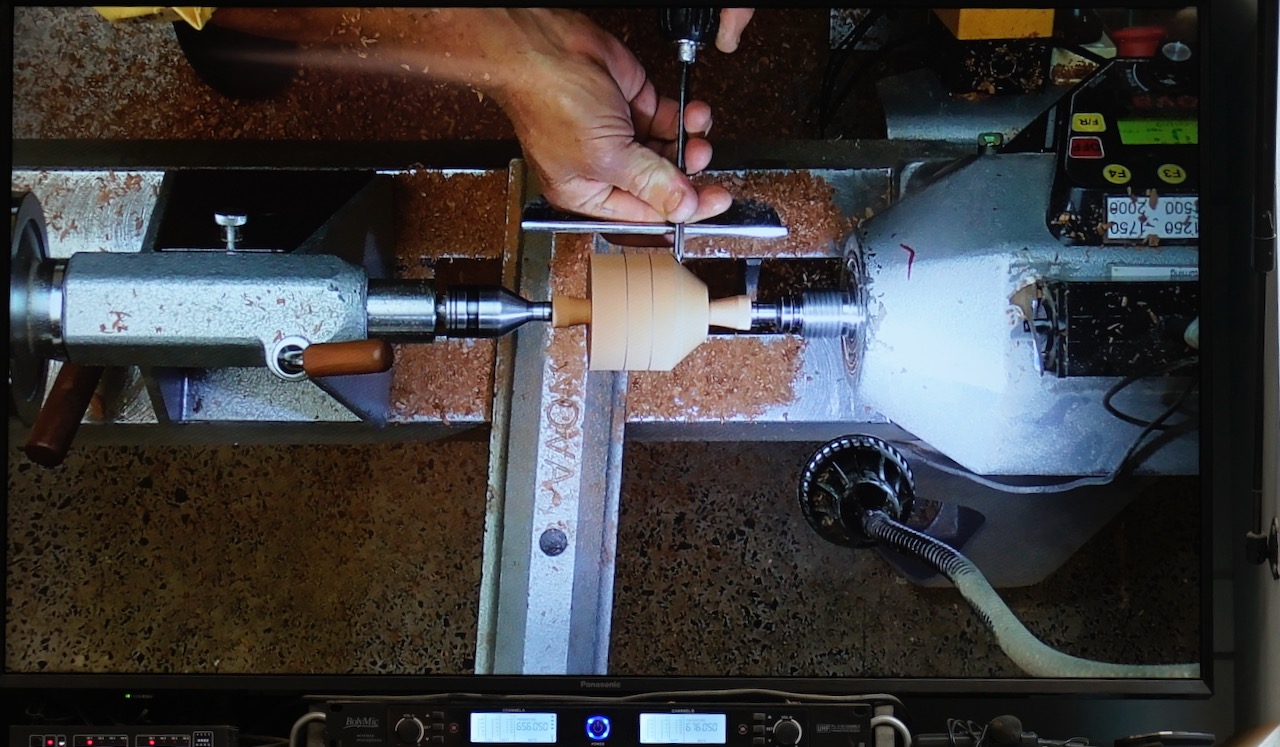
Bruce began by turning a sphere using Soren Berger Sphere Calipers(SBC). The process involves creating a cylinder of equal diameter along the length of a piece 100x70x70 between Steb Centres. Determine the center of the piece to guide the marking out of the diameter of the sphere; the Diameter is defined by the long arms of the SBC. at approx 50mm. Clearly mark out on the length of the turned cylinder. cut down using the Parting tool and remove the waste wood from the line to toe Steb Centers. Face off ends to ensure square to cylinder and the length of the cylinder now equals the diameter.
Using the large beak of the SBC mark lines on each end, one from the ends on the outer surface on the outer surface and one on the squared off face from the outer surface. The next step is to remove between these lines so that there is a straight line/surface NOT CURVED.
Using the small beak of the SBC mark lines on each end, one from the ends on the outer surface on the outer surface and on the squared off face from the outer surface. The next step is to remove between these lines so that there is a straight line/surface NOT CURVED.(You can follow the process on Youtube)
Using a stainless steel tube, with a handle in one end and sharpened on the belt sander to create an squared face, carefully remove the remaining high points to form the sphere. Part off.
Re-mount between so waste at right angles having cut off as much as possible of the nipples left using a saw or knife centres using cups with leather inserts, turned to fit over live Steb centres or on the drive center albeit a threaded piece or designed to fit an insert in a chuck.
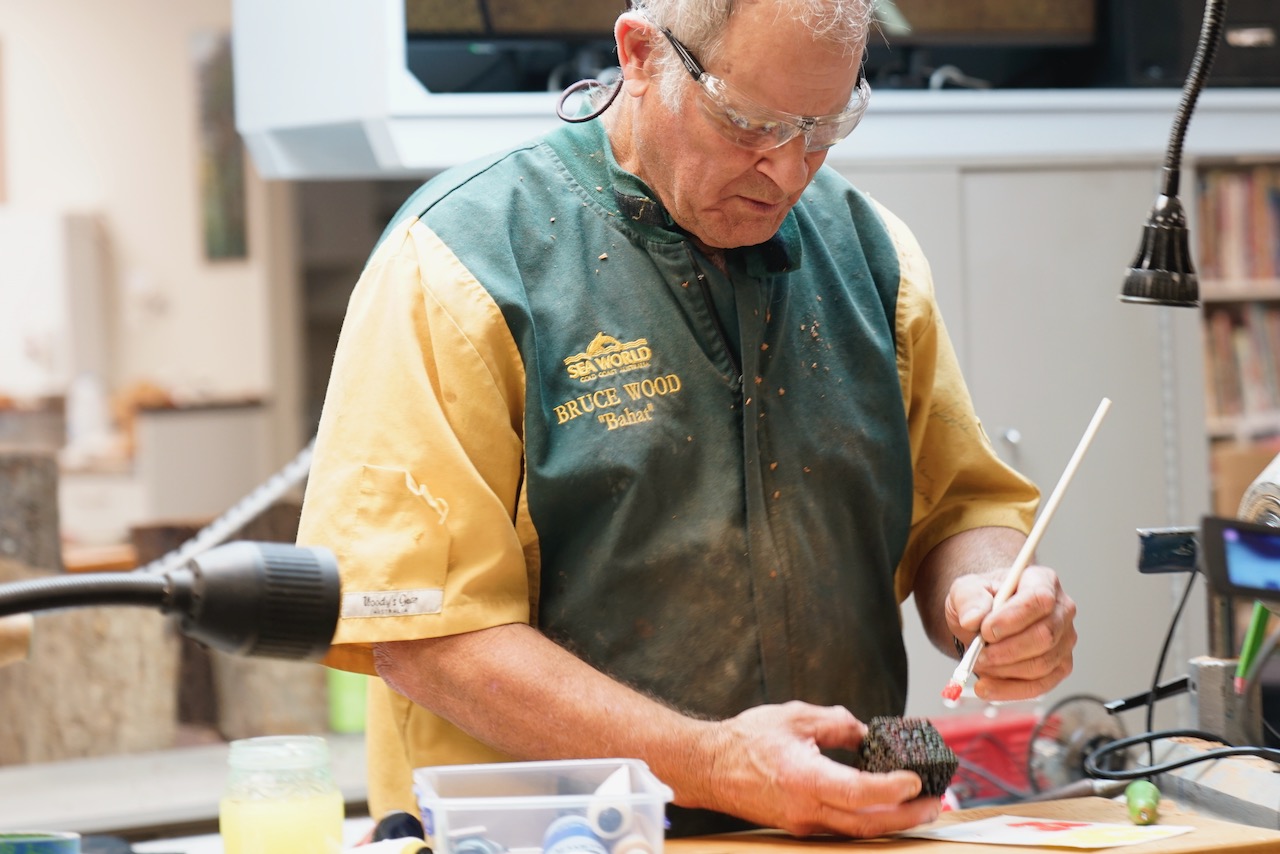
Part 2
Bruce used pyrography to define the lines of the design using a pyro knife. light pressure to start and cleaning carbon from blade. The design called for areas to be “excavated” so a pyro chisel bade was used and again frequent cleaning. Bruce then used cup spheres of different sizes in the design and these are available from Regal Castings,(Check with Kevin D??)
Part 3
Bruce then coloured to work starting with Indian Ink/ He illustrated a trick to remove the gloves used to protect hands – blow into the glove at the point the glove and inside of the wrist. Several water colours were applied using a brush. A drop of paint on a paper towel, put a little on the brush and then brush/wipe to remove the majority before applying residual on top of texture/embossed to form highlights on work and dry with hair dryer between coats. Colours used – Yellow, Red, Blue, Green, White and Gold.
A thoroughly absorbing and informative demo – Thanks Bruce.
Club Meeting: 30 August 2023 Report by: Bill Alden
Kevin stressed that Preparation is important
Start by drawing a plan to scale choosing two complementary shapes. A scale drawing will allow you to take measurements directly from the page.
The next stage is to prepare boards to desired thickness (10-15mm). Mark out your boards with rings a little larger than the plan dimensions and drill the centre to fit the mandrel (12mm) then cut the disks on the bandsaw. Sand the faces . Inner shape for gluing and outer shape for finishing later.
Turning
Prepare a thick tenon block for a 50mm chuck and drill a 12mm hole to fit the mandril. Stack the disks for the inner shape in the order on the plan on a mandril with the grain aligned and add backer pieces to support the end disks. The same procedure is followed for the outer shape
Tighten the mandril leaving excess length to protrude into headstock, and fit to a chuck using the tenon block Rough out the shape using 1800-2000rpm to help avoid chipping the edge. Use a shear cutting action on final cuts to get a clean cut with no tear out. Consider the grain direction and cut ‘uphill’ for a grain supported cut. Repeat for both shapes and sand to a finish.
Partial Assembly
The pieces are removed from the mandrels and restacked back on a mandrel in alternate pieces from the outside form and then the inside form. It could be possible at this point to stack the pieces put aside to make another piece however new top and bottom layers may have to be added. The grain direction is aligned the upper to be hollowed. Kevin then remounted the piece on the lathe in order to take off sharp edges of outer shape.
Glue all joints except the one between upper and lower sections. Use the mandrel as the clamp.
Glue in a dowel into the bottom half leaving a little dowel protruding to fill the bottom of the upper hollowed section.
Using a compression chuck to hold the upper half, drill with a Forstner bit to the desired depth (location of end of the dowel from the lower half).
Hollow inside of upper half. Bear in mind the wall thickness of inner shape.