Club Meeting: 4 December 2024 Report by: Roger Pye
If ever there was a member of the SAWG who loves turning wood, it certainly has to be Jonathan. He is by day, a professional surgeon, who works at Middlemore Hospital and then, after hours he has become a “Wood Surgeon”.
Somehow there must be a connection between carving flesh by day and then wood after hours. After all, he has such a happy smile standing behind his lathe and cracking jokes this must be his outlet following a day of serious and detailed concentration involving hospital surgery.
The Original
Johnathan spotted an interesting figurine made with wooden components on his European travels. This “little man” is made entirely of wooden components, all of which can be turned on conventional woodturning equipment. At a cost of €26.00 Johnathan purchased his sample from which he soon sorted out how to make and assemble the exact same thing. So tonight, at the SAWG, Johnathan is passing on his methodology.
Basic materials are wooden blocks of Macrocarpa or anything similar, even Oak.
Dimensions:-
45mm x 45mm – 125mm long
20mm x 20mm – 125mm long
10mm x 10mm – 125mm long
Each of the above are used for various body parts.
Main body with two parts; his bottom which will become what he actually sits on, then his torso which is shaped like the top and narrow part of an egg. (Refer to photographs herewith.)
Hands and nose.
Head and hat.
A tray of Christmas presents in various shapes and sizes is not part of this demo, but as illustrated can be added.
Components are made with a “fingernail” spindle gouge and two chucks, one 50mm and the other with jaws for the smaller parts. Hands are spherical at 10mm diameter and drilled for a 2.5mm mounting dowel. The nose is a tiny cone.
From the 20mm rod turn a head (another sphere). To show a beard use a Japanese draw saw to cut a carefully placed 45º cut from the forehead to the chin. Cut it off at right angles then sand with a circular sander mounted on the lathe spindle. This will provide a recess for the face inside the head. (see photo) The cap, made from the same diameter wood will be concaved to fit over the head and shaped as in pixie shape and fitted later with a pompom.
Painting is another exercise requiring a spraying gun (alternatives are possible). Paint the body green and the base black. Use acrylic tubes to paint the head white and the nose red the face left plain is “touched up” when finished. The final assembly is rather fun if you choose various statures for the finished man.
The result
So, it was a fun demo, and a good look into miniature woodturning, certainly a good way to use up a few scraps.
Club Meeting: 27 November 2024 Report by: Ian Connelly
First the night started off with a brief discussion about Oyster Catchers, if you want to see some then the local hotspot is said to be Mangere Bridge – check with Dick for details.
Now on with the turning.
Started with a block about 60x60x250, mounted between steb centres.
With a spindle roughing gouge this was rapidly made round with the lathe running at about 1500rpm.
Strett then went on to make a spigot on one end, opps too small, so we ended up with a better sized spigot on the other end.
He then smoothed the piece with a skew chisel – pointing out to use removing waste wood as an opportunity to practice using the tools.
He then shaped the body with the spindle roughing gouge before separating it from the waste.
Then a jam chuck was used to tidy the other end – hot melt glue assisted the jam chuck.
Another piece of darker wood 50 x 50 was mounted in the chuck with the steb live centre supporting at the tailstock end.
It was then turned with a combination of the skew and the spindle gouge into a head for the bird.
Next a thin piece of wood, held in the centre of the chuck was turned for the legs, down to 6mm at the ends, with a “knee” in the middle. The legs were then cut at an angle and glues back together rotated to create a bent leg.
The legs were glued into 6mm holes in the body, and the head was glued on after creation a small flats on the head and body.
With the creative use of a piece of “natural” timber the Oyster Catcher was then mounted.
A great demo from Strett, who took all the audience suggestions in his stride to make it another very enjoyable night at the club.
Club Meeting: 20th November 2024 Report by: Rebecca Waite
On November 20th, Dick Veitch captivated the audience with a vibrant demonstration inspired by the renowned UK woodturner Phil Irons, featured in this month’s online NAW meeting. For a deeper dive into Phil’s stunning work, check out his website: Phil Irons Woodturning.
Before diving into the demonstration, Dick showcased an exquisite piece turned by Dick and coloured by Phil, alongside a striking blue vase he created using a similar colouring technique. The vase was pre-turned and sanded, setting the stage for the creative process.
Dick began with a piece of highly rippled macrocarpa, emphasising the importance of selecting the right wood. He explained that lighter woods not only enhance the vibrancy of colours but also contribute to the overall beauty. For a balanced vase design, Dick adhered to the rule of thirds, allocating one-third for the top and two-thirds for the base. He marked his wood and began to shape it into a tulip-like form, using a spindle roughing gauge sharpened at a 35-degree angle. After achieving the desired silhouette, he sanded the piece to a smooth 250-grit finish.
The colouring process was equally intriguing. Dick utilised the colour-fast Bri Wax spirit-based dye, which can be explored further at Briwax Wood Dyes. He began with black dye applied with a brush as the lathe turned slowly, removing excess dye with a paper towel soaked in clear methylated spirits—wearing gloves for protection, of course. Allowing the dye to dry for 30 minutes.
Next he started power sanding with 320 grit while the lathe runs at 100 RPM. It’s normal for the sanding paper to clog with paint, so keep going until you see some white wood. Then, apply the blue Briwax colour-fast dye, wipe off the excess, and let it dry for 30 minutes. Thankfully, Dick was well-prepared and showed us a piece with both black and blue.
Avoid water-based Briwax dye because it takes longer to dry and can raise the grain. Next, sand again with 400 grit to remove some stain, then repeat the dye step again then sand with 600 grit. This lets you gradually work through the grits and add more layers of colour to achieve your desired look—one of Dick’s finished pieces had three layers of black and one of blue.
Different woods affect dye colours; for instance, macrocarpa has a yellow base that alters the dye’s appearance. The key challenge is to find the right balance of sanding and colouring. Dick also noted that different woods can dramatically alter the appearance of dye colours, with macrocarpa’s yellow tones influencing the final outcome. He expertly navigated the challenges of achieving the perfect balance of sanding to colour, concluding with a suggested finish of low gloss lacquer for a polished look.
This demonstration not only showcased Dick’s skill but also sparked creativity and inspiration among participants, making it a memorable event in the our woodturning community!
Club Meeting: 13th November 2024 Report by: Rebecca Waite
Julie, a member of the North Shore Woodturners Guild, brings over 20 years of experience in woodturning and has mastered a variety of techniques. In tonight’s demonstration, she introduced the members to the traditional Shou Sugi Ban, also known as Yakisugi. This classic Japanese method involves charring the surface of cedar cladding to preserve the wood. By burning the wood, a protective layer of carbonized material is created, significantly enhancing its durability and resistance to the harsh elements of the Japanese climate. The process typically involves the following steps:
Charring: The wood is exposed to flame until the outer layer is charred. The level of charring can vary depending on the desired effect.
Cooling: After charring, the wood is allowed to cool. This can sometimes involve wetting the wood with water.
Cleaning: The charred surface is brushed to remove loose ash and reveal the textured surface beneath.
Finishing: Often, the wood is treated with oils or sealants to enhance its appearance and further protect it.
Julie shared stunning examples of her work with this technique, and my favourite was her coffee canister. The Shou Sugi Ban method is particularly effective for items designed for heavy use.
Julie arrived well-prepared, bringing two half-turned bowls, each featuring spigots at both the top and bottom. The bowls were finished on the outside, and sanded to a smooth 240 grit, ensuring that there was no tear-outs, which would be noticeable after the charring process.
Additionally, she created a burn line on the rim of the bowls using Formica because she wanted a crisp definition between the burnt wood and the unburnt wood
Safety
Julie does the charring process outside with a bucket of water handy as her workshop has a lot of dust. Wear a safety shield/glasses, and also have a spray water bottle, Fire extinguisher, and fire blanket on hand.
To achieve this you will need a blow torch. Julie uses a canister from bunnings
A brass brush – make sure it is brass and not steel coated in brass as it won’t be soft enough
Julie’s first example was a Paulownia bowl, which she charred heavily.
She held it in a chuck on the tool rest, then hand-turned it and charred the bottom then the top. After brushing it, she charred it again and brushed it once more. Once she achieved her desired look, she turned the inside of the bowl, cutting just past the burn line at the rim. It’s important to make a clean cut for the rim before removing the top spigot.
Sand carefully to avoid scuffing the finished rim.
Julie’s second bowl was a small oak bowl, which she lightly charred without brushing. She then painted it with Red Briwax colourfast spirit-based wood dye. If you use a spirit-based colour, be sure to apply a water-based finish; using a spirit-based finish could risk removing the colour.
With oak being a hardwood, you can turn the bowl thin without leaving a “chicken bottom”—a term Julie used to describe a thick bottom due to being too chicken cutting deeper. Once your bowl is finished, let it sit for a day before applying a final finish.
Some helpful information from Woodworking Magazine when thinking about using this technique
Wood types suitable for this treatment
Non-porous or Softwoods lack vessel cells, as water is conducted through tracheid cells in the living tree. Various softwoods exhibit distinct growth-ring patterns. For instance, white pine has non-distinct rings with relatively uniform stain absorption, similar to diffuse-porous woods. In contrast, yellow pine features clearly defined rings, with more noticeable stain uptake in the earlywood compared to the latewood, resembling ring-porous woods. Examples include cedar, pine, spruce, redwood, and Julie’s favourite, Paulownia.
Ring-porous woods are hardwoods recognised by a unique growth pattern in their wood structure. In these woods, larger and more abundant pores are present during the early growth season (spring), while in the later growth season (summer and fall), the pores become smaller and more closely packed. This creates a clearly identifiable annual growth ring. As a result, these woods typically exhibit a coarse texture due to the size of their pores. – Oaks, Ash, Chestnut, Black Locust, Honey Locust, Elms, Pecan, Ban Tree, Hickory
Semi-Ring Porous Wood: This type of wood features a mix of both ring-porous and diffuse-porous characteristics. In semi-ring porous wood, the early wood (spring growth) has larger pores, while the late wood (summer growth) has smaller, more densely packed pores. This structure allows for a balance between strength and moisture management. Common examples include some species of oak and ash, Black walnut, black cherry
Diffuse Porous: In certain species, such as maple, cherry, and yellow poplar, the pores are fairly evenly distributed throughout both the earlywood and latewood. While most domestic diffuse-porous woods feature relatively small-diameter pores, some tropical varieties, like mahogany, possess larger pores. These woods typically exhibit uniform stain absorption, They are commonly referred to as closed-grain woods. Examples are American beech, birches, maples, American sycamore, sweet gum, sour gum, aspens, willows, dogwoods, tulip-poplar, basswood, red alder, sugar maple, yellow birch, and yellow poplar
Illustrations above by Mary Jane Favorite, based on photographs from R. Bruce Hoadley’s “Understanding Wood”
Julies garden Sculptures using this treatment
Factors Julie considers when using this technique:
Planning: Carefully plan the sequence of tasks since sanding cannot be performed after charring. Ensuring all shaping and detailing are completed before applying heat to achieve the desired finish without the option to go back. A massive thank you to Julie for a fantastic, entertaining and informative demonstration. If you would like to get hold of Julie, you can contact her via email at julie@gannaway.nz Julie mentioned other techniques like sandblasting your piece, examples and inspiration visit Pascal Oudet on Facebook https://www.facebook.com/@PascalOudetSculpture/ or his website https://www.lavieenbois.com/welcome/
Wood Dryness: Ensuring the wood is adequately dried to prevent warping or cracking.
Grain Alignment: Assessing the grain direction for optimal aesthetic and structural results.
Hardness Suitability: Choosing wood hardness appropriate for the intended use; softer woods may not hold intricate details well.
Ease of Finishing: Avoid complex designs on softer woods, such as kauri, as they can be challenging to sand and may not retain fine details effectively.
Colour of the Wood: Considering the natural colour and any desired finishes, as this impacts the final appearance of the project. Whitewood like oak is great for Briwax colourfast wax
From Friction to Flock, Journey with a Bowl Gouge.
Club Meeting: 30 October 2024 Report By Cory Wyatt
Our journey starts with our mighty turner lamenting how he was bullied into tonight demonstration, followed by a small interval of him wandering around trying to remember what he forgot to bring, “you always forget at least one thing” wise words from Terry Scott. Once on track the work started.
Making the Box
Using a 100 x 110 mm square, by 60mm deep blank, with the centre marked and biddled (using the nail thingy with a handle to mark the centre point), Ian attached the blank to the lathe with a friction chuck. He had a 50 mm jawed chuck mounted on the head and Steb centre in his tail stock. He then moved the tail stock up with the blank and held the blank on to the jaws by friction. He tightened up his tail stock checked his clearances and hand rotated his lathe to check for any issues before turning it on.
With the speed set to 1000 to 1200 rpm, he started shaping the outside of the box with his bowl gauge, just like you would a bowl, creating a spigot on the Steb end with a push cut. He did not round the square edges first; he did the shaping and rounding at the same time. All cuts were done so that there was wood supporting the bevel as the cuts were being made. Once the form is ready sanding can be completed once the outside of the box had the desired shape and finish, the project was reversed and the spigot place in the jaws and tightened. Speed set to 1500-1600 rpm. The top of the box was then faced to ensure a flat surface with a push cut. The hollowing started with leaving a lip in the box for a lid to sit on later. The hallowing was completed with the bowl gauge. Depending on the shape of the box and the angles a skew can be used to create the desired shape. At this point the inside is ready for sanding.
Once completed you can reverse the box and remove the spigot, this can be done in many ways, using a jam/friction chuck, Cole jaw’s, vacuum chuck, expansion mode with chuck, etc. When happy sand and finish as before.
Flock the Box
To make the Box standout Ian flocked the inside of the box by painting the inside the same colour as the flock he wanted to use. Once the paint was dry, he painted the inside of the box with an even coat of flocking glue (any clear drying glue such as PVA may be suitable), before using his flock gun to add the flock and get an even coat. By using the same colour paint and flock, this helps hide any inconsistencies with the final covering of flock. Ian used a Rayon flock which he got from Carbatec many years ago. It was noted that you could use a mixture of paint and glue to speed up the process, but if your paint mixture dry’s too quickly the flock wont stick.
Making the lid
The lid can be made form the same wood, a contrasting wood or other material. The key step is to not make the lid to tight. Again, Ian started with the friction chuck and used his push cuts to make his spigot, and shape the lid. He then turned the lid around and mounted the spigot in the chuck before facing the top of the lid at about 1200 rpm. He moved his toolrest to level with his centre point and used the calipers to mark a guide for his recess. Remembering to only have the edge with the wood travelling downwards make contact with the wood. He then used his push cuts to make the recess using the already made box to check the fit and make any changes as needed. Once the fit was right, he tapered the lid to ensure a good fit. You can also taper the underside and add texturing as desired. The lid was rounded and turned around and the spigot removed with the friction chuck, using push cuts into the piece, not along the piece to avoid throwing the lid at the front row. The speed was then turned up for a cleaner finishing cut.
The completed box can be finished as you see fit, but note that some wax finished will have white spots when wet or exposed to hand creams. Hard oil finishes seem to handle the water and hand cream better.
Here is a list of places to check for your flocking needs: Carbatec NZ and Timberely as normal. If you want more info either see Ian and Terry or google. For the same Flocking gun as Ian try: https://www.etsy.com/nz/listing/851880211/mini-flocker-flocking-applicator For NZ based flock stockist try: https://www.msfibreglass.co.nz/flock-coating-hamilton Be wary of wargaming and modellers flock used for model railways etc, as these can be much grainier than what we are after and may damage the wood or jewellery. Temu and Ali Express also have flocking guns/kits and a wide range of colours and prices, but most are listed as nylon, not the rayon used by Ian, so results may vary.
Report: 23 October 2024 Report by: Kieran FitzGerald
The theme this term is Sea and Sky. I specifically asked Terry if he could demonstrate making one of his winged pieces. Without hesitation he replied “Ok, I’ll do a flying vessel”. Come the night for his demo, and Terry exhibited at least six of the pieces that he had previously made. “I call these my midas pieces,” he said, “because they’re going to make me rich.” Uh uh! Unfortunately that expectation has not been realised. Which is a bit weird, because the pieces are exquisite. Ranging in size from approx 140mm to about 400mm, each one is a delicate combination of beautiful form and detail, with the overriding feature being the lovely thin arch of the wings, which frame a complementary shaped lidded box and finial. Some are embellished with leaf carvings, paint and gold leaf, another features two carefully carved piwakawaka (fantails).
As he showed us how he makes the pieces, Terry explained in detail the entire process and gave us countless tips to boost our own skills. Indeed, the rich commentary and the advanced tool skills made this one of the most absorbing demonstrations I have seen. I will try and give a synopsis of the demo, but Terry will have to forgive me if I omit or err in some of the steps.
The work begins with a brick shaped piece of wood which is 150mm long, and I’m guessing about 90 x 90 square. The whole thing is made from one piece of wood. The edges need to be dead square, and parallel. You need to choose a close grained timber which is well and truly dry. The piece Terry is using tonight is kiln dryed kwila, but in the past he has used sapele, London plain, rimu, Queen ebony (Soloman Islands ebony) and black maire. Design is important. The wings need to have a continuous curve and even thickness. The wood is held in the lathe with the length perpendicular to the bedway. Mark centres very carefully because even a mm out will cause the tips of the wings to be uneven. The head stock and tailstock must be perfectly aligned. The end grain will run up and down. Initially the wood is held on a screw chuck. If you mark the position for the screw hole with a phillips screwdriver, the drill will centre perfectly on the dent. With a felt pen, mark out the curve of the wings.
Chip out on the wings can be an issue, and one tip Terry gave was to glue wastewood on the sides. However for the demo he did not do this. His weapon of choice was a 55° fingernail grind bowl gouge. Terry explained that he wanted the gouge to engage the cut at a point where the wood transitioned from coming down off its top arc to beginning to go round on its descent. The first cuts will begin to form the bottom of the box at the centre, and the outwards curve of the underside of the wings. Remember that the orientation of the wood is the same as turning a bowl. Draw cuts towards the tips, and push cuts from the tips inwards to the centre. The best advice here is to listen to the chisel. Position the chisel on the bevel and raise the handle to begin the cut. Feel the cut at the point where the direction of the cut changes. Continue to shape the bottom of the box and the underside of the wings. Make a spigot on the bottom of the box for when you turn the piece around on the chuck. As the tips of the wings get thinner you may strengthen them with superglue. Once satisfied with the underneath side of the box and wings, Terry used a threaded reversing live centre in the tailstock to grip the tenon before flipping it round to be held in the headstock. With a black felt tip pen he marked the desired thickness around perimeter of the wings. The next operation was a true Terryism. He hot glued four struts between the box and the tips of the wings to provide support to the tips. Terry said without them, centrifugal force could cause the tips to flex by up to 5mm. It is necessary to keep the lathe speed up because of the wood/air factor.
With the wings strengthened, Terry began to shape the top of the wings. In this orientation, the cut starts just on the drop off – the tool rest is about 20mm below centre. As for a bowl, cut from the outside to the inside. Leave a central core for the top of the box and the lid. At this stage the tailstock is still up. Terry explained that practice and experience will tell you which cuts leave the best finish. He uses a combination of push and draw cuts, noting that the tailstock inhibited some cuts. Observe carefully which cuts cause the least tear out and chip out on the edges. Superglue on the edges may help to eliminate chip out. The box needs to have a rebate cut for the lid, and to be hollowed out. The portion of the box that is above the wings is carefully shaped to maintain a flowing curve from the portion under the wings. Terry used Vernier calipers to measure this.
Once happy with the curve and thickness of the wings, and the box is shaped, the next step is to make the lid. For the demo. Terry had a separate piece of wood (cut from the same block), so he turned away the unused wood from his blank. However to get a perfect grain alignment he would use a saw to cut off the lid portion from his initial piece. The winged piece is turned around and remounted to turn away the spigot and do final shaping of the box. Terry described a number of ways which the wood could be held securely to do this. The use of cardboard templates assisted with maintaining the box’s finished shape and thickness. A further step is to make a finial – Terry achieves perfect vertical alignment by turning finials as part of the lid.
Terry talked about and showed us examples of pieces where there are variations to the design – upturned wings may be left on, or can be carved into forms such as the piwakawaka. The design possibilities are many. The main thrust of this demo as far as I was concerned was to watch the cutting techniques for making those beautifully formed, delicate wings, and this Terry was successful with. The true test will be in the doing – can we achieve this ourselves? I’d say, yes, but expect to get better with practice. Thanks Terry. Loved it.
Brian explained that he would show us “therming” (Art Liestman – on line) which is off centre turning multiple pieces of timber at the same time.
He had 2 identical circular jigs with inner tenon recesses for the pieces (that have tenons on each end) , that were to be turned, were placed. When put together, the 2 jig end plates with pieces in between looked a bit like a ‘cotton reel’.
The ‘cotton reel’ was put on the lathe and held with chucks at both ends.
The set up should be tight but with enough movement to allow to index turn the pieces.
You set the indexing that you want. Then you must move each piece to the first index line. When all 4 are setup, Tek screw through the jigs into the pieces. The screws should be off centre (to the pieces)
Start the lathe slowly, 500rpm, and speed up to about 1200rpm, or to what you are comfortable with.
Turn to the depth require. Bryan suggested that you make a template to set the depth. This will ensure even shapes.
When you are happy with the first setup, you take out the screws and set the pieces to the next index line. Replace the screws and turn the second part.
Repeat this 2 more time, and you should have 4 pieces the same off centre shape.
Bryan pointed out:
Ensure the jig setup is always tight on the lathe.
Remember to replace the screws
Start the lathe slow and increase the speed slowly to your comfort level.
Report 25 September 2024 Report by: Kieran FitzGerald
Warning: graphic descriptions and metal working references. This report contains references to metals and metal devices, and may be harmful to some woodworkers. If you are affected by this report, you may obtain help at South Auckland Woodturners Guild Inc. | Turning Tomorrow’s Treasures (sawg.org.nz).
The demonstrator this week is Jon Pearse. Jon was introduced as our resident inventor, and it is noted that in addition to his skills as a metal working machinist, Jon has completed all his the required courses and obtained his National Certificate in Woodturning in less than 2 years.
Check out Jon’s YouTube channel where he posts regular videos, including a number where he makes jigs for the wood lathe. The Hobby Machinist NZ – YouTube.
In this report you will see how Jon successfully blends his metal engineering abilities with his woodturning talent.
Jon began by welcoming the audience in German, a language he has been studying for a while. He went on to discuss in simple terms how a rose engine works, and showed us a couple of bowls which have recently been embellished by club members on the SAWG rose engine (there is an “ornamental group” within SAWG which meets every fourth Monday night of the month; newcomers are welcome, contact John Whitmore).
The stumbling block for the common turner, of course, is the outrageous price of a rose engine – commonly upwards of USD$100,000, out of reach for most of us. This set Jon to thinking about how he could replicate some of the functions of the rose engine with a jig that could be used on the wood lathe and developed within the ranges of a manageable budget for your average Joe Turner.
The components of Jon’s jig are a mixture of steel fabrications made in his workshop and pieces purchased cheaply from Chinese sources on the internet. He described the construction in a relatively simple manner and logical order.
First up is a 1 ½ inch boring head, typically used in a milling machine for boring holes. Jon will attach a variety of cutters to the boring head and drive it using the headstock spindle of the lathe. The cutters are secured with grub screws. The boring head is inserted in to the spindle via a number 2 morse taper, but it also requires a tie back rod to prevent accidental self ejection. Jon made the necessary modifications in his metal workshop.
The body of the jig is fitted on the bed way of the lathe. It is made up of: A metal base plate and spacer block which tightens on to the bed and can be slid to the appropriate position. The purpose of the spacer block is effectively to elevate the jig to the required cutting height, which is in line with the centre height of the spindle. While Jon built his base plate and spacer block out of steel, it could potentially be constructed from wood or other materials.
Next Jon attached a cross slide table to the spacer block. The cross slide table is a positioning mechanism with two planes – one which moves laterally across the bed, and one which moves parallel to the bed. Fine positioning is achieved with hand wheels on each axis (just like advancing the tailstock quill on your wood lathe).
Sitting on top of the cross slide table is a 4” rotary table mounted vertically. This can be precisely turned from 0° to 360°. Affixed to the front of the rotary table with bolts is an adapter with a 1 ¼” x 8 tpi thread which the chuck from the wood lathe can be screwed on.
When a wooden bowl or lidded box is held stationery in the chuck (with tenon still on obviously), it can be manually presented to the cutter(s) to produce an infinite variety of patterns and decorations.
The components bought on the internet (boring head, cross slide and rotary table) cost in total about $230 NZD.
Jon made a number of cutters from HSS 8mm drill bits and centre drills in his workshop, but Holm advised cutters can be purchased on the internet from the USA.
Jon demonstrated how the jig operates, firstly on the side of a lidded box. He laterally inserted a pointed 90° cutter in to the boring head. After securing the base of the lidded box in the chuck, he adjusted the jig so the box was adjacent to the cutter and parallel to the side of the bed.
With the lathe running at 2000 rpm, he turned the hand wheel to move the cross slide table in which engaged the cutter. After making one cut, he advanced the rotary table by 20° to make the next cut. Rinse and repeat. Jon made 4 cuts then moved the cross slide 4.5mm so that more cuts can be made further along the side of the box. For this second row of cuts he also phased the angle on the rotary table by 10°. This offsets the second row of cuts to produce a brick wall type pattern. He explained that it would take too long to complete all the cuts around box with multiple rings of cuts spaced apart, so he handed around finished pieces which demonstrated the nature of the cuts he was making. The pieces included patterns made with a flat bottom cutter. While some samples showed cuts were sharp and clean, others, particularly those made with the flat bottom cutter, had visible signs of tear out. Jon put this down to the type of wood used (which was soft), along with the flat bottom cutter.
The flat bottom cutter should only be used with dense tight grain hard woods.
Next Jon used a 45° detail cutter to decorate the top of a lid. The detail cutter is mounted in the front of the boring head. This cutter is used to make barley corn designs, about 1/4mm deep. The top of the lid needs to be flat, and the jig positioned squarely on the bed to achieve a consistent depth of cut. Using the cross slide table, the jig is adjusted so the cutter tip rotates between a picture frame line on the outside of the lid and the centre of the lid. The lid is then advanced gently in to the cut. After starting with the rotary table set at 0°, it is turned to 10° to make the next cut. This process is repeated over and over until the pattern circumscribes the whole lid.
With some slight adjustments to the cutter and the jig, and also using the ‘bump’ and ‘half-moon’ cutters, Jon demonstrated different patterns on the sloped outer perimeter of the lid. As before, he did not complete a pattern because of time constraints, but the finished examples he passed around were stunning in their precision, detail and finish quality. This is amazing considering the whole set up and operation of the jig is manually performed: Jon described it as using his eyecrometer. If you remember using a sprirograph, the patterns achieved with the jig are exactly the same as those that astounded us as kids.
To cap it off, Jon showed that the jig could also be used to make patterns on other materials and he demonstrated cuts within aluminium.
Jon has made a YouTube video on this jig. If you want to watch it here is the link: Ornamental Turning Device (youtube.com).
Thanks Jon, for an absorbing demonstration. The cleverness of the jig aside, your commentary and presentation is totally enjoyable. You’d better start thinking about what you are going to do for your next SAWG demo.
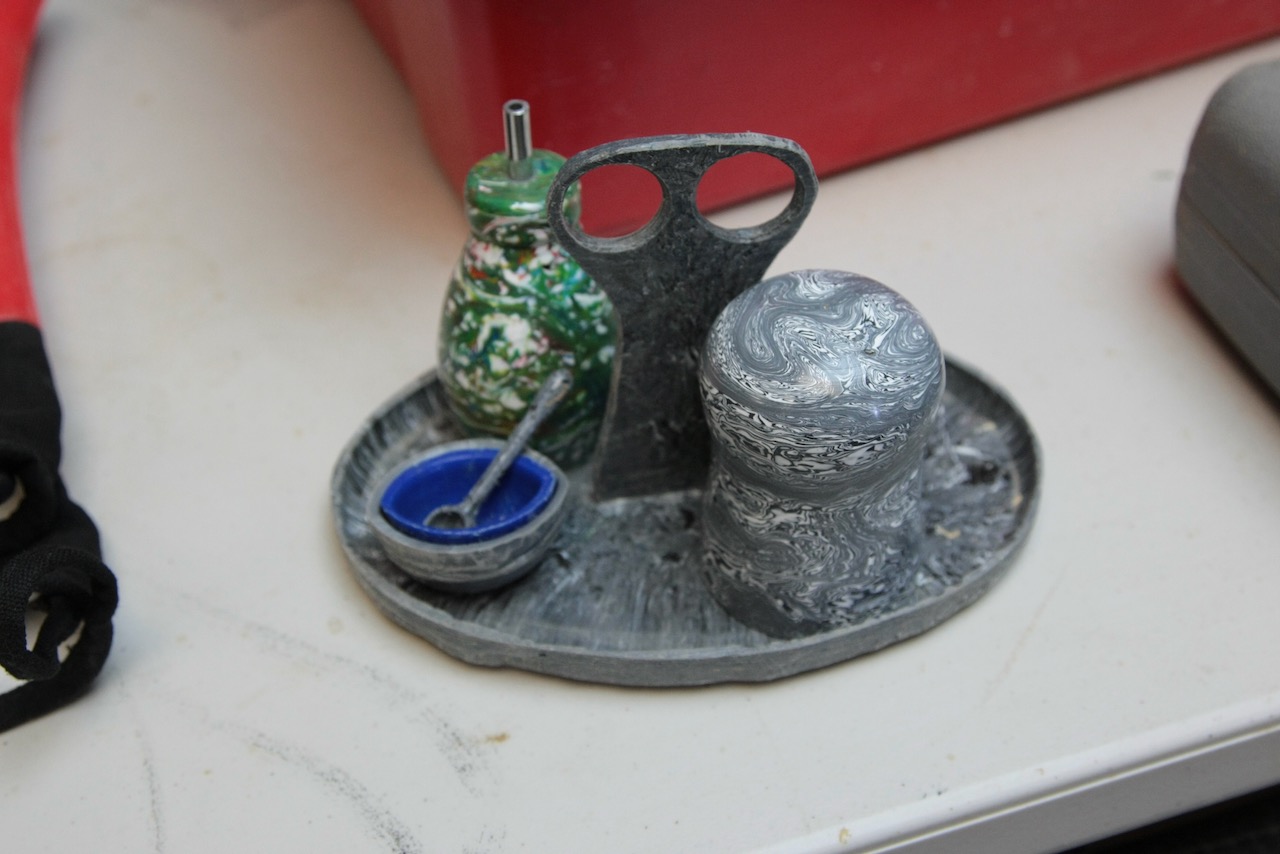
Club meeting: 18 September 2024 Report by Roger Pye
As usual Dick had done his homework on producing various cruets from recycled plastic. So, his demo was a story in three parts.
Part One – Selection of recycled plastic.
The plastic to be reused for turning must be HDPE. For recycled plastic, the ID is 2. It is most commonly used in the production of milk bottles. Other sources are available, white pill-bottles from your chemist is worth a try.
Having obtained your collection of HDPE scrap it must then be broken down into small pieces. A good pair of secateurs will do the job.
Part Two – Rework the scrap plastic into a suitable “turning” size.
The shape and size of your blank is determined by the dimensions of the end product you wish to make. This involves using dense and strong wood to construct a mould which will be capable of withstanding high pressure. Normally the mould will be made in two equal halves and be held together in two opposite directions with coach bolts. (ie Eight bolts). Using a Forstner drill bit, drill a centre hole to the depth required. A close fitting “ram-rod” is needed to apply pressure when your scrap plastic is inserted.
Your item to be made will require a predetermined weight of plastic, (ie Prior to turning) Weigh-out this weight in scrap and proceed to soften as follows. Use an oven or other form of controlled heating. Maximum temperature 180º. A couple of Teflon sheets (obtainable from the Warehouse or Briscoes) help to avoid your softened plastic from sticking in the wrong places. When softened at 180º and using gloves, start kneading your soft plastic and eliminate air bubbles. While still soft, or if necessary reheated, insert into your compression mould and apply the best pressure you decide is necessary to achieve a solid blank of plastic.
A typical wood-vice will suffice, or other like cramping tool. Remove from mould by unbolting the two halves of your wooden mould.
Part Three – Making a plastic cruet set
These items are really a matter of choice. Bear in mind that a mould can be made to match any simple shape. The outer section of a mustard cruet and an inner bowl for it can be formed in premade moulds and cleaned up for use with sharp tools. Typically, this is likely to be a repetitive production line set-up.
Run your turning speed as low as 500 RPM. With sharp tools a good finish is possible. When sanding, choose a slow speed as any friction gets hot and will melt rather than sand. Perhaps wet and dry sanding could achieve a better result.
Using the same mix of recycled plastic, a matching set of salt and pepper grinders can easily be added to this collection. Because the plastic “Crush Grind” elements are inclined to slide around inside the actual cruet set of holders, some effort should be made to dig out notches for the grinder components to “lock-in” within the newly turned holders.
Conclusion
SAWG are fortunate to have a Dick Veitch who is clearly committed to exploring every nook and cranny of woodturning and then demonstrating to members how to use plausible and worthwhile methods. This is just another example.
Club Meeting: 11 September 2024 Report by: Bob Yandell
The club had the good fortune to have 4 experts present on the key equipment we have or use either at the Club or at home:
Bandsaw
Bench Grinder
Lathe
Chucks
Bandsaw – Mark Williams
Mark outlined his background associated with Bandsaws which began as a Saw Doctor in the Waipārera Sawmill through sales at Thode and his current position at Carbatec. Starting with the history of bearing blocks of Black Maire soaked in oil, multiple steel bearings through to Ceramics, again with oil and then the current home used bandsaws and their bearings. The affect of oil and sawdust on the performance of the bandsaw.
The structure and choice of the Bandsaw blade was explained and the correct unfolding and folding of the blade drew admiration from all present. The ideal blade is a bimetal blade, 6TPI and 1/4 inch. The blade should be tensioned as much as possible and once tensioned a maximum of 5mm movement side to side. Clean the wheel with turpentine to remove any sawdust. Regular cleaning is recommendeD
Grinder – Dick Veitch
A quick overview of the key safety features to be observed.
Safety shield should be put down after use.
Lock the slide once correct position has been set.
Never put Tool Steel on CBN wheel.
The white or blue wheel (Aluminium oxide) is for tool steel tools. The aluminium oxide wheel can be cleaned and flattened with the diamond dresser. Tool Steel sparks much more when being ground, if in doubt test your tool on the aluminium oxide wheel.
Lathe – Roger Latimer
The focus was how to remove the clean and maintain the Headstock , tailstock and the banjo.
The focus on the Headstock was the need to be sure to remove the power source and wait at least 5 minutes before removing the cover plate as the unit is designed to hold power for a short period to prevent damage. The Headstock only needs to be cleaned once a year or when an error message “0 or 1” is displayed. The locking pin is made of steel and the indexing wheel is made of aluminium so susceptible to damage if over loaded. Vacuum the dust out and be careful if blowing.
The tailstock should be cleaned more frequently as dust can get in the quill. Keeper plate is subject to wear on the headstock side due to the pressure exerted when drilling, it can be turned around or should be replaced. It needs to be lubricated with graphite grease.
The banjo can be adjusted and a light lubricant applied.
Chuck – Ian Connelly
Remove the jaws.
Use quality circlip pliers to remove the circlip from the back of the chuck as the tension in the clip is likely to break cheaper versions. Ensure the position of the slides are marked (use a sharpie) or a centre punch to mark the first slide. For a supernova chuck hit the insert with a wooden mallet and the protective dust cover will pop off. Remove the scroll ring and slides. Clean using throttle/carburetor cleaner as it will not leave a residue and apply a light coating of grease.
Reassemble in the reverse order. Push the slides into the centre. You may need to rotate the scroll ring to get it to seat correctly on the slides.
I serviced one of my chucks to make sure that I was following the directions and I failed, hence the need to move the scroll ring until the slide adjusters located. Refer Teknatool.com – How to service Nova Chucks.
A thorough and comprehensive series of demonstrations. Needs to be repeated.